Tampilkan postingan dengan label Online Business. Tampilkan semua postingan

Jumat, 08 Mei 2009

Advertise Your Links by Using Random Banner

Hi everyone, I hope all of you are in a good health, :). It's been 3 days after my last posting, Own your Debit Card for FREE from Payoneer, I do not post anything in my blog due to my other activities. Here I am back again to share this simple technique how we can show our banner in our blog randomly.

I think it's effective to show our banner for the readers randomly. It's better and not taking many spaces to attach our banner one by one in our blog. When you have put this banner-It can be more than 5 banners you can put in your blog-there will be different banners appear in your blog every time you refresh your blog.

Well, Tips of Blog will share the script and you just put this script in your Page Element in your blog. It will be over in no time for there is nothing difficulty to put it. Put the script below in wherever you want;
<script language="JavaScript">
<!-- Begin
var Ads_Sum = 5;
var Cur_Time = new Date()
var second = Cur_Time.getSeconds()
var Ads_Sub = second % Ads_Sum;
Ads_Sub +=1;
if (Ads_Sub==1) {
txt="";
url="Your URL Target";
alt="Your Banner Title";
banner="Your Banner URL";
width="468";
height="60";
}
if (Ads_Sub==2) {
txt="";
url="Your URL Target";
alt="Your Banner Title";
banner="Your Banner URL";
width="468";
height="60";
}
if (Ads_Sub==3) {
txt="";
url="Your URL Target";
alt="Your Banner Title";
banner="Your Banner URL";
width="468";
height="60";
}
if (Ads_Sub==4) {
txt="";
url="Your URL Target";
alt="Your Banner Title";
banner="Your Banner URL";
width="468";
height="60";
}
if (Ads_Sub==5) {
txt="";
url="Your URL Target";
alt="Your Banner Title";
banner="Your Banner URL";
width="468";
height="60";
}

document.write('<left>');
document.write('<a href=\"' + url + '\" target=\"_top\">');
document.write('<img src=\"' + banner + '\" width=')
document.write(width + ' height=' + height + ' ');
document.write('alt=\"' + alt + '\" border=0><br>');
document.write('<small>' + txt + '</small></a>');
document.write('</left>');
// End -->
</script>
Now you can manage this script by focusing in Red line and manage your banner height and width by changing the size in RED line. You can also add your banner how many banners you want to show in your blog. I hope your work can work well.

In advance, thanks.

Selasa, 05 Mei 2009

Own your Debit Card for FREE from Payoneer

I have a friend who has had this kind of card, Free Debit Card and I do like to have it. I asked him how he got the card and he showed me the way to get it. I think I have to share this for all of you since it doesn't need money at all to have it.

Here is the sample of my Debit Card ;


This is absolutely free. The question is 'what is really the use of this Debit Card?' Well, take a look of the Payoneer FAQ below;

Payoneer markets, manages and services prepaid MasterCard® cards. Payoneer works together with MetaBank to issue and process our cards. A leader in offering prepaid solutions for online applications, Payoneer has offices in New York and Tel Aviv

The Payoneer Prepaid MasterCard works just like any other Prepaid MasterCard card. The card is accepted at all locations worldwide, where debit MasterCard is accepted electronically. You can use it at a point of sale location to make purchases and at an ATM* to withdraw cash. With the added security of choosing your own PIN, you can be assured of no unauthorized use of your card.

To get this Free Debit Card, Tips of Blog will share the step to get it and Follow the instructions Below;

STEP I
  1. You have to register to FriendFinder to have an account. Click FriendFinder Registration to create a new account.
  2. Click JOIN NOW that you can find at FriendFinder Website
  3. Fill Your Complete Data (Follow the instructions given at the Website)


  4. After filling your data, you will be asked for filling the next page. You can fill it according to the instructions given. After filling your complete information on page 2, click the button to finish your registration.
STEP II

Now, you have passed the step I to be a member of FriendFinder. After passing the step I, follow the instructions below to be a member of FriendFinder Affiliation;
  1. Create your account at FriendFinder Affiliation
  2. Click Affiliate Signup
  3. It's recommended to fill your VALID data
  4. Preferred Program : Just Choose Number 1
  5. First Name : Your First Name
  6. Last Name : Your Last Name
  7. URL : Enter your URL or Blog
  8. Desired Password : Fill your Password
  9. Preferred Newsletter Language: English
  10. Email Address : Enter your Valid Mail Address
  11. Secondary Email Address : Just optional, you can also enter your another mail
  12. Checks Payable To : Fill your REAL Name
  13. Street Address : Your Address where you live
  14. City : The City where you live
  15. State/Province : Your State
  16. Country : Your Country
  17. ZIP/Postal Code : Your Postal Code
  18. What is your business tax classification? : Just leave it blank if you are not U.S Citizen
  19. Tax ID or Social Security Number: Leave it blank if you are not U.S Citizen
  20. Phone Number : Your Real Phone Number with International Format like 628123456 7899 instead of 081234567899
  21. Which Instant Messenger do you use? Choose your IM
  22. Use ePassporte : Choose No
  23. Please give us your comments: Leave your comments, anything, it's up to you
  24. After that, Click "Here for the Last Step"
  25. Make a check List to the agreement of FriendFinder
  26. Click SUBMIT
Now, You have had an affiliation account in FriendFinder Website and you can earn money by promoting your referral URL.

STEP III

To register in Payoneer and get the FREE Debit Card, follow the instructions below;
  1. Now you can login to your Affiliation Account.
  2. Go to your Accont Information at the top right of your page.
  3. Update your Account Information by clicking for the sign "Here is your account information. Click here to update your information."
  4. Click the "Signup to be paid by..." and you will be directed to the Payoneer Debit Card Registration. Click the Blue Button to register like the button below;


  5. Follow the instructions by filling your Real Name and Information
  6. Keep in mind that you have to fill your real Address due to your card will be sent to the address you fill.
  7. Finish and Submit your Registration
  8. Wait for 3 weeks for delivery of your Debit Card
Thanks for your patience. Wish you Good Luck !

Earn Money from BidVertiser Referral Program

How is your blog? Most people have known about blog even they have made it for earning money as passive income. Beside we make a blog for useful purposes, we can also use it for earning money. Indeed, there are so many referral programs which are offered to users as publishers. BidVertiser Referral Programs offer us this kind of program which can earn money in our blog.


Make use of your blog by registering as a referral publisher in BidVertiser. It doesn't take much time to register it. Here is a short of information from BidVertiser Payment for the users how much they make money from this referral program.
When a user signs as an advertiser and first spends $10, we'll
credit your account with $5. When that same advertiser
spends $50, you will be credited with an additional $20.
When a user signs as a publisher and first earns $10, we'll
credit your account with $10. When that same publisher
earns $50, you will be credited with an additional $40.

Register your account and earn money from BidVertiser Referral Programs. CLick the button below to register your account for FREE;


The Payout is $10 and it will be transferred to our PayPal Account. If you haven't had PayPal account, you can directly register it for FREE by clicking the button below;

Sign up for PayPal and start accepting credit card payments instantly.

Kamis, 30 April 2009

10 Free Ways To Increase Blog Traffic

1. Signup at Stumbleupon.com and make friends in your niche. You can then stumble your post and get your friends to also.

2. Go to Socialposter.com and fill in the exact url to your blog post then title,general summary text then your tags. Now submit to as many social sites as you can. If this is your first time to use these sites then you will need to signup.

3. Signup at technorati.com and add your blog then ping it when you update.

4. Get a free account at mybloglog.com and add your blog then join the communities and make friends. There is even a cool widget you can add to your blog like what you see on the right here.

5. Leave comments on blogs in your related niche. Here is a great free tool to monitor popular blogs in your niche so you can be notified and make one of the first good quality comments. Check it out at Commentsniper.com

6. Join Squidoo.com and make a lens then add a link to your blog.

7. Submit your blog to as many blog and rss directories as you can. Here is a good place to start http://www.masternewmedia.org/rss/top55/

8. Make sure and add your blog url to your forum signature on any forums you are a member. This can be a powerful way to attract visitors especially if you have quality forum posts.

9. Find one of the top bloggers in your niche then write a good review post of them. Let them know and they will probably link back to you.

10. Have an easy way for your readers to sign up for your RSS feed./eyeearnblog

Rabu, 29 April 2009

Blogtimize - Optimize the ads on your blog

When working with a blog, you're facing some interesting ad implementation challenges: a predetermined page format, highly targeted content, and regular visitors, among other things. To make the most of your readership and content, here are a few suggestions:
Blend ads into your blog

To increase the likelihood that your readers will see and click on your ads, blend your ad units into the background of your blog. Choose a bold color for the ad title to help draw attention to your ads, then make sure that the background and borders of your ads are the same color as the background of the area where the ad is placed.


Experiment with multiple ad formats and locations

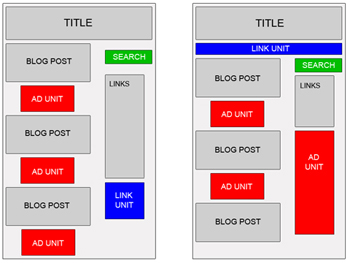
In general, wider ad formats tend to be more reader-friendly. Placing an ad unit after the first post will likely catch your readers' attention. Take a look at our sample implementations to get some ideas. Also, consider placing a Skyscraper (120x600) or vertical link unit on the right side of your blog. If you're using Blogger, you can find instructions on placing AdSense code in your blog's sidebar.

Offer readers more options with search and referrals

To make sure you're earning the most revenue possible with AdSense, go beyond just ads to use AdSense for search and referrals. You can increase your earnings, provide readers with valuable information, and take advantage of flexible formats.

Improve ad targeting

With section targeting, you can target an ad unit to a specific section of your blog, as well as block out irrelevant sections like navigational links. We recommend that only those familiar with HTML attempt to implement section targeting.

Tip for generating more traffic to your blog: If you're a Blogger user, activate this setting to notify Weblogs.com, a blog update notification service, whenever you have updated your blog. That means your blog will be included in various "recently updated" lists on the web as well as other blog-related services./Google

Senin, 27 April 2009

15 Great Google AdSense tips to earn money

Google AdSense Tip #1: Find your keywords
Before serving ads on a web page, check its keyword density. A free and advanced tool for finding the most prominent keywords in a page can be found here: SEO Density Analyzer. Copy the most important keywords to a text file ([web page name]-Google AdSense-keywords.txt).

Google AdSense Tip #2: Improve your keywords
Get keyword suggestions from Overture Search Inventory and from Google AdWords Sandbox. Get new keywords that can help you improve your ad relevance. Enter the keywords from [web page name]-Google AdSense-keywords.txt and save the suggestions to [web page name]-Google AdSense-suggestions.txt.

Google AdSense Tip #3: Keep your website focused on a theme
Use the keyword suggestions to enhance your web pages and to build theme-based content. And also try to get your keywords into the anchor text of your incoming links as much as possible. Don't forget that Google Google AdSense is keyword-targeted advertising: Google Google AdSense bases its advert topics on your websites content, this means that content-rich websites of a popular topic should attract a large amount of ads.

Google AdSense Tip #4: Write a new page every day
One of the best tips is to add a new page to your web site every day. The more content you have, the more visitors you will get. Put an Google AdSense unit on each and every content page of your site. But where? You will find more about that from the next Google AdSense tips.

Google AdSense Tip #5: Choose the right Google AdSense format
Wider formats are successful because the ads are compact, easy to read and are complementary to the content. The top three Google AdSense formats are:

336x280 large rectangle

300x250 medium rectangle

160x600 wide skyscraper


Another successful format is the 468x15 horizontal ad links, that can be placed under your navigation bar.

Google AdSense Tip #6: Color tips
When creating your Google Google AdSense ads it is recommended to use the color scheme and style of your website so that the ads blend in well. Ads without background color and borders perfom better than ads within borders with background color.

Create a custom Google AdSense palette:

border color = background color of your web site

background color = background color of your web site

link color = blue, color of your links

url color = black, #999999

text color = black, #333333, color of your main content

You can also rotate your color palette: select multiple color palettes that blend with your site to create variety.

Google AdSense Tip #7: Position tips
Visitors tend to look at the big headlines to see if your page is worth reading. If you get them interested, they will read the text and look for your navigation links.

Place the Google AdSense ads in a prominent place around the top/left part of your page or under your headlines, where your visitors are most likely to look at.

If you have an article page with a long body of text, the bottom of that article is a good place for Google AdSense ads because your visitors read the text and then they want more resources.

Google AdSense Tip #8: Increase the number of ads
If you have a lot of text on a page, use multiple Google AdSense units. You can use up to three Google AdSense units on a page, two Google AdSense search boxes and one unit of ad links.

Link units allow the user to refine what they're interested in. So if they may not be interested in specific ads on your page, they might be interested in a particular topic, and by clicking on a link unit and a link in the link unit, they'll be able to specify that they're interested in that specific topic and get a lot more options and variety on the ads that might appear.

Google AdSense for Search allows visitors to search Google.com or your sites (up to 3 domains). You earn money whenever they click on the ads that come up on the search results. If you click the Open search results in a new browser window checkbox in the Google AdSense for Search settings, you won't lose your visitors.

Google AdSense Tip #9: Preview Google ads
You can find out what ads will be served by Google Google AdSense if you install Google.

Google AdSense Preview Tool, a very simple tool available only for Internet Explorer 6.0. Click to advertiser sites without generating invalid clicks, and easily add their URLs to your URL filter list. Because Google AdSense uses geo-targeting, Google serves different ads for other countries. Instead of faking your IP or travelling abroad to test your ads, use this Google AdSense tool to see what ads see your visitors from France, Germany or other countries.

It's possible there are no Google Google AdSense adverts available for your webpage. Hide Public Service Ads, using alternate colors or images. Make sure you include the image in a simple html file as a link (use target="_top"). The image size should be the same as the dimension of Google AdSense units. In the alternate url box, enter the absolute url of the html file.

Read more about alternate ads.

Google AdSense Tip #10: What not to do
Don't click your own ads

Don't ask others to click on your Google ads

Don't manually change Google AdSense code

Don't place Google ads on sites that include prohibited content (e.g.: adult sites)

Don't employ cloaking, hidden text or farm links

Don't use Google AdSense ads on the same page with similar ads (e.g.: Yahoo Publisher Network)

Google AdSense Tip #11: Show images above or next to your ads
Placing images above Google AdSense ads is not necessarily prohibited by program policies. However, depending on the method of implementation this could be considered encouraging users to click on ads. So you should include a border line between the ads and the images. Don't show specific products in your images, in order not to mislead the visitors. Just use generic images that will increase the visibility of your ads.

Google AdSense Tip #12: Use section targeting
Use section targeting to emphasize some content in your page. On your site, place this code where you want to emphasize.

Content you want to emphasize.

If you want some content to be ignored, use

Google AdSense Tip #13: Alternate the colors of your ads
Google AdSense allows you to have up to 4 color variations for each variable for which you can specify color. You should do that if you put Google AdSense ads on pages that receive many impressions from the same visitors (for example forums) to reduce ad blindness. For example:

google_color_border = ["628098","628098","000000","000000"];

google_color_link = ["000000","BBB90C","BBB90C","628098"];

google_color_url = ["000000","628098","000000","000000"];

google_color_text = ["628098","628098","000000","000000"];

Great for overcoming ad blindness.

Google AdSense Tip #14: Your Google ads should be visible
Make sure your text ads are visible to the surfers in all screen formats. If you put the ads in a table give sufficient breathing room, i.e. proper cell padding and cell spacing to make the ads stand out from the rest of your content.

Google AdSense Tip #15: Use Google AdSense channels
You can categorize the content of your website into channels and then track your performance. This way you can experiment with different types of ads and see which is performing the best. Instead of buying an Google AdSense tracker, you can enter the most important pages in your site and see how they are doing. Create up to 200 channels for Google AdSense.

William Mok is one of the internet marketing company CEO and he is a successful internet marketer.To receive more internet marketing tips and free e-book , please visit./www.marketonair.com

Twitter Delicious Facebook Digg Stumbleupon Favorites More

 
Design by Free WordPress Themes | Bloggerized by Lasantha - Premium Blogger Themes | Powerade Coupons